Chlorosis is the technical name for when a plant’s green pigment is blocked, and it often shows as pale, yellow foliage.
When a favorite houseplant starts to lose its color, the first things to check are soil quality and essential nutrients. Most often, an issue with feeding or watering interferes with chlorophyll production.
Many green specimens in the room will react to stress by shifting color. This can happen in a single pot or across a whole garden if roots are crowded or the media lacks air.
Quick tip: If plant leaves start to turn yellow, assess moisture, drainage, and whether the mix needs fresh fertilizer.
For a practical guide to diagnosing and fixing these signs, see this concise care article at why plant leaves turn yellow.
Understanding Why Yellow Leaves on Indoor Plants Occur
A gradual fade in a plant’s foliage color usually points to a hidden problem below the soil line. Identifying the specific causes yellow leaves is essential because this change is often a symptom of deeper stress.
When someone notices plant yellow, they should take time to inspect each leaf for patterns of spot, edge, or uniform fading. Chlorosis can spread and, if untreated, may kill branches or the whole specimen.
- Check soil moisture and drainage first — improper watering is a common cause.
- Look for nutrient shortfalls; a lack of nitrogen or iron often causes yellowing.
- Inspect roots and pot size; crowded roots reduce uptake and cause stress.
- Observe for pests or disease that can trigger rapid decline.
Understanding these causes helps ensure plants stay lush year-round. Quick inspection and targeted fixes often reverse yellowing before permanent damage occurs.
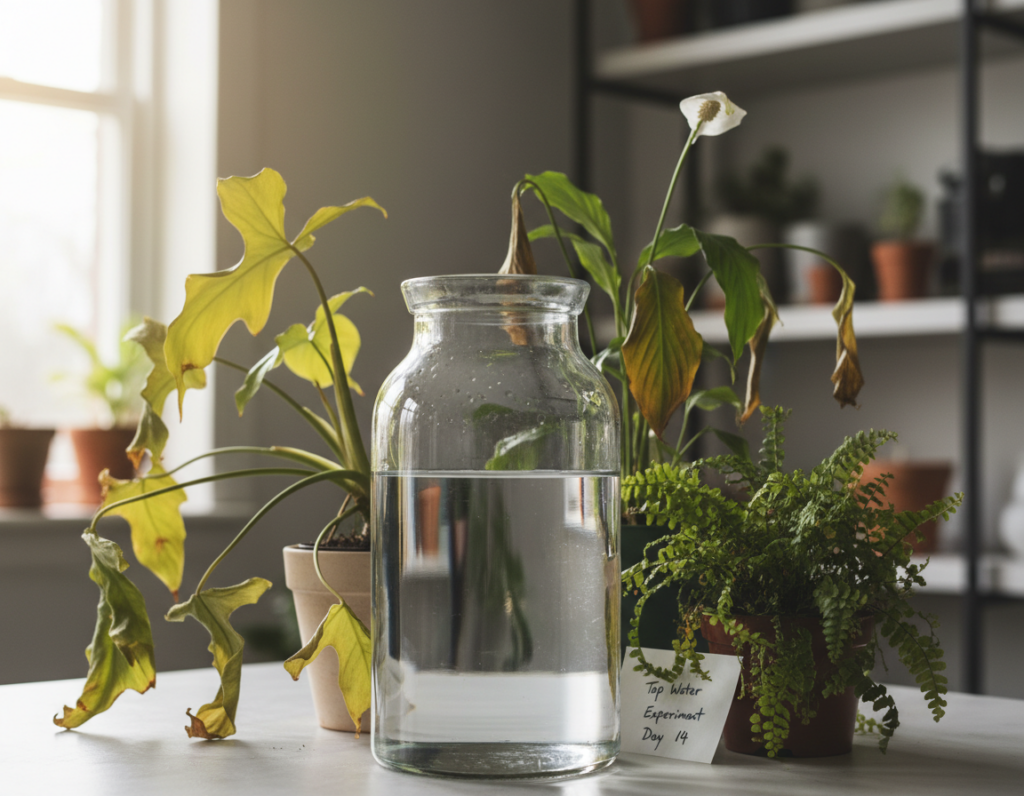
Evaluating Your Watering Habits
A quick check of how often and how much you water reveals many common problems before foliage shows serious decline. Good watering keeps soil healthy, roots active, and leaves vibrant. Small routine changes often prevent stress and the need for corrective treatments.
The Finger Test for Moisture
The finger test is simple: push an index finger a few inches into the potting mix. If the soil feels dry at that depth, it is time to water. If it feels cool or damp, wait several days and test again.
Avoiding Root Rot
To prevent root rot, water only when the top soil is dry to the touch. Use a well-draining mix such as Pennington Full Season Potting Mix; its earthworm castings and bio-stimulants help roots stay healthy.
- Water until moisture reaches the bottom, then discard any excess that collects in drainage holes.
- Proper drainage stops soggy soil from denying roots the nutrients they need for strong leaf growth.
- Check moisture every few days rather than following a fixed schedule to match actual plant needs.
Assessing Light Exposure and Environmental Stress
Plants placed in dim corners can slow photosynthesis and begin to show color loss and weak growth. Check the spot in the room first and note how many hours of bright, indirect light it receives.
Move a pot to brighter, indirect light as a simple step in this care guide. When light is low, a plant uses water more slowly. That change raises the risk of overwatering and further leaf decline.
Proper light and proper watering work together to help roots take up nutrients from the soil. Watch how the specimen responds over several days after relocation.
- Rotate the pot weekly to get even exposure.
- Avoid harsh midday sun; bright, indirect light is best.
- If growth stays weak, test the soil and adjust feeding.
Inspecting Roots and Potting Conditions
The condition of the root ball often explains moisture and nutrient issues faster than leaf checks. A quick, careful look below the soil line helps identify crowding, rot, or poor drainage.
Signs of Being Pot-Bound
Check the root mass by easing the plant from its pot. If roots circle the edge or form a tight knot, the specimen has no room to expand.
When roots are crowded, the plant cannot absorb enough water or nutrients. Water may rush through the drainage holes immediately, which often means the potting container is too small.
- Inspect roots for color and texture: healthy roots are whitish-yellow; rotting roots are dark, mushy, and foul-smelling.
- Gently remove soil to look for compaction or blackened tissue that signals rot or disease.
- Addressing a root-bound issue early prevents persistent yellow leaves and long-term decline.
For guidance on diagnosing rot and treatment options, see this concise root rot guide.
Identifying Nutrient Deficiencies and Soil pH
Specific patterns in foliage often reveal which soil nutrients a plant lacks. Inspect older growth first; many shortages appear there before the rest of the specimen shows stress.
Nitrogen Deficiency Patterns
Nitrogen shortages cause older leaves to fade first. The change usually moves upward as the issue worsens. Correct with a balanced plant food that supplies quick-release nitrogen.
Potassium and Magnesium Issues
Potassium problems show as pale edges with a darker center. Magnesium creates yellow patches between veins on older leaves. These distinct patterns help pinpoint which nutrient to supply.
Soil pH Balance
Most garden soil should sit near pH 6.0–7.0. If pH drifts, roots cannot access nutrients even after feeding. Test the soil, then adjust with lime or sulfur as needed.
- Tip: Use a pH meter and a balanced plant food to restore uptake.
- Addressing the right deficiency prevents spread and supports new growth.
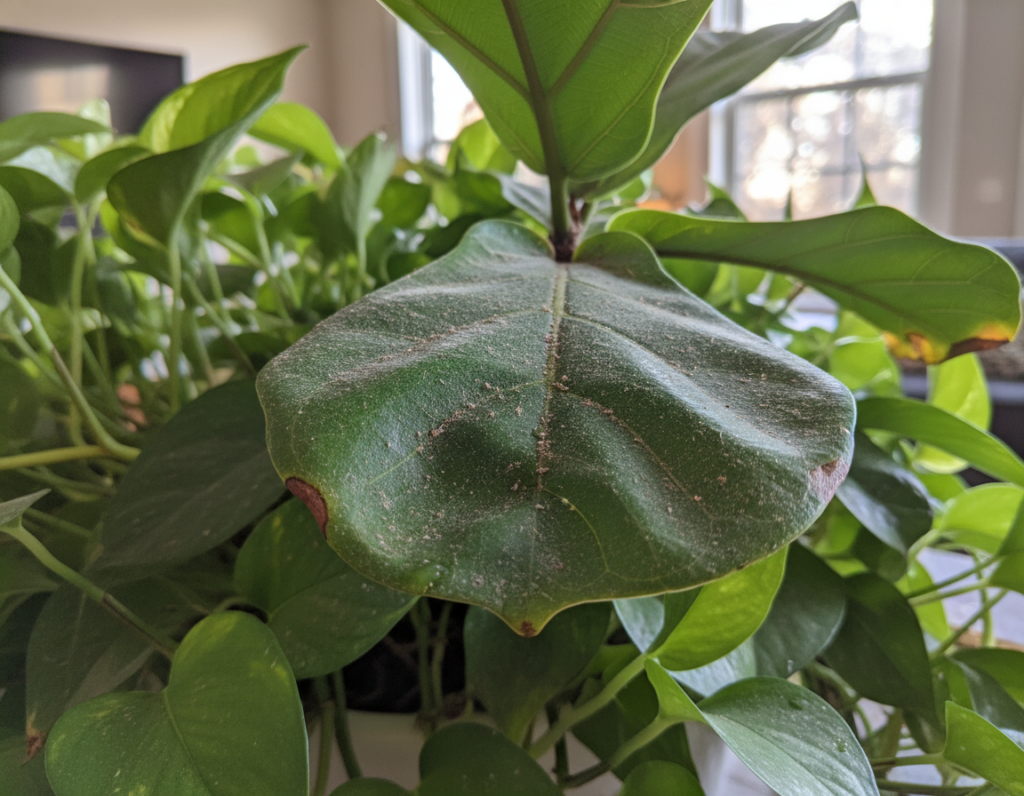
Checking for Common Plant Pests
Small, hidden insects that sip sap can quickly weaken a specimen and show as paler foliage. Mealybugs, spider mites, and aphids feed this way and often hide at the bottom of a leaf where they do the most harm.
If you spot fine webbing or a sticky residue, treat the issue promptly. These signs usually indicate pests are the primary causes of yellow symptoms.
- Pests like mealybugs and spider mites hide under the leaf and suck sap, which weakens the plant.
- Sticky deposits or webbing signal an active infestation that can make stems and roots fail.
- Treat with neem oil or a spinosad spray to remove insects and stop further damage.
Regular inspection of each pot and its soil will catch infestations early. When the root system and foliage are weakened, the whole plant may turn yellow as it struggles to recover.
Conclusion: Restoring Your Plant to Health
Restoring vigor starts with a calm, systematic check of root, soil, and care habits. First, use the finger test so the soil feels right before you water. This simple tip prevents many common problems that cause yellow leaves and slow decline.
Next, ensure the pot offers good drainage and that moisture moves through the mix. Use a quality plant food, follow package rates, and allow a few days to see improvement.
Monitor the pot and leaf color over time, adjust watering intervals, and keep a short care log. With steady steps, the guide above will help the garden recover and stay healthy.